Senin, 13 Oktober 2014

CARA MEMBUAT KARTU NAMA DENGAN PHOTOSHOP CS6

Berikut merupakan langkah-langkah dalam membuat kartu nama yang sederhana dengan menggunakan media photoshop CS6.
Langkah pertama, buka aplikasi adoube photoshop CS6.
Langkah kedua, buka file kemudian klik new dan isi sesuai kriteria dibawah ini.
langkah 2
Setelah mengisi kriteria sesuai tampilan diatas kemudian klik ok. Maka akan tampil tampilan seperti dibawah ini
langkah 3
Langkah ketiga, klik layer kemudian pilih new setelah itu klik layer.
langkah 4
Maka akan tampil gambar seperti dibawah ini,
langkah 5    langkah selanjutnya klik ok.
Langkah ke empat, klik rectangle tool.
langkah 7
Pilih kriteria seperti gambar dibawah ini.
langkah 8
Langkah ke lima, tarik krusor hingga menutupi back ground berwarna putih kemudian enter.
langkah 9
Langkah ke enam, klik horizontal tipe tool.
langkah 10
Setelah itu pilih jenih tulisan Dan jenis ukuran
langkah 11
Setelah dipilih sesuai keinginan anda, silahkan tarik krusor ditempai yang anda inginkan untuk menulis nama. Lingkaran merah adalah untuk mengganti warna tulisan.
langkah 12
Langkah ke enam, klik layer kemudian new setelah itu pilih new layer (lakukan seperti langkah ketiga).
Langkah ke tujuh, klik brush tool.
langkah 13
Untuk merubah ukuran garis dan jenis garis klik gambar yang dilingkari merah.
langkah 14
Langkah ke tujuh, tekan shift dan tark krusor dibawah tulisan nama. Maka akan menampilkan tampilan seperti dibawah ini.
langkah 15
Langkah terakhir, untuk membuat no telp dan alamat gunakan langkah yang sama seperti membuat nama.
Berikut adalah hasil kartu nama yang telah jadi.
langkah 16
Demikian cara membuat kartu nama yang mudah dengan menggunakan photoshop CS6.

Desain Kartu Nama Menggunakan Photoshop

Desain Kartu Nama Menggunakan Photoshop – Siapa bilang kartu nama hanya dibutuhkan bagi para profesional, pengusaha, pengacara, maupun jurnalis? Faktanya, kartu nama pun dibutuhkan bagi kita yang tengah merintis karier dan berusaha untuk meningkatkan prospek kerja.
Apa pun pekerjaan Anda, kartu nama dapat meningkatkan prospek secara keseluruhan melalui beragam cara. Setidaknya, ada tiga alasan utama mengapa kita harus memiliki kartu nama
  • Terlihat profesional
  • Menggambarkan diri Anda dan
  • Membantu melebarkan jaringan
Setelah kita tau bepata pentingnya kartu nama, maka kami akan memberikan contoh Desain Kartu Nama Menggunakan Photoshop, sehingga anda dapat mendesain kartu nama sendiri. ketika sobat bisa mendesain kartu nama sendiri, sobat bisa menghemat biaya sekitar Rp.20.000,- sampe Rp.50.000,- atau bahkan lebih dari itu, di tambah nilai kepuasan bagi diri kita  sendiri. Mari kita lakukan langkah-langkah tutorial berikut ini
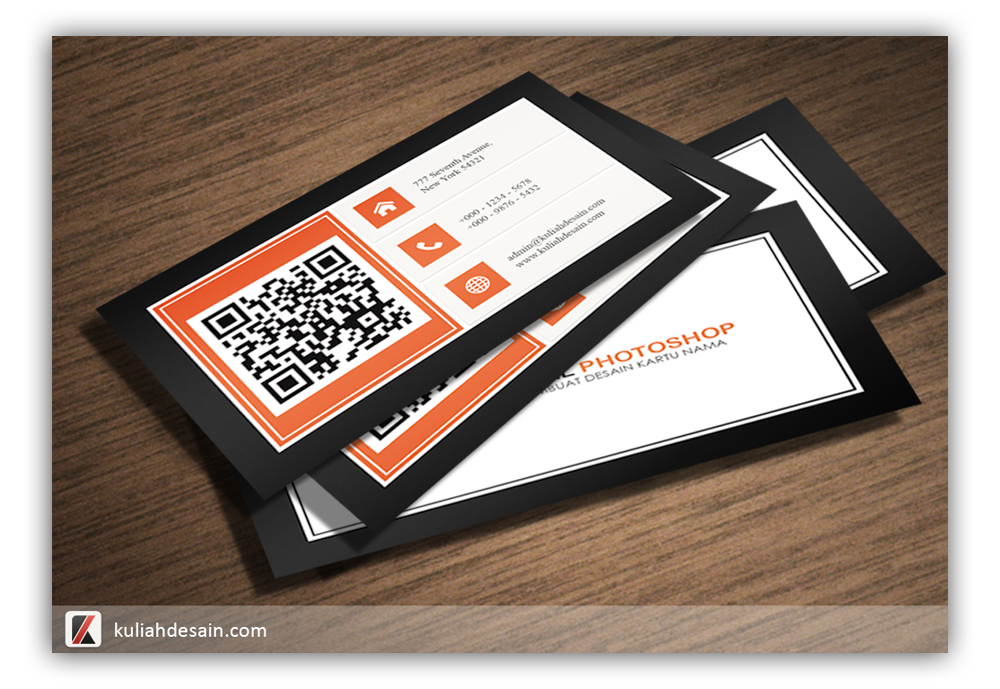
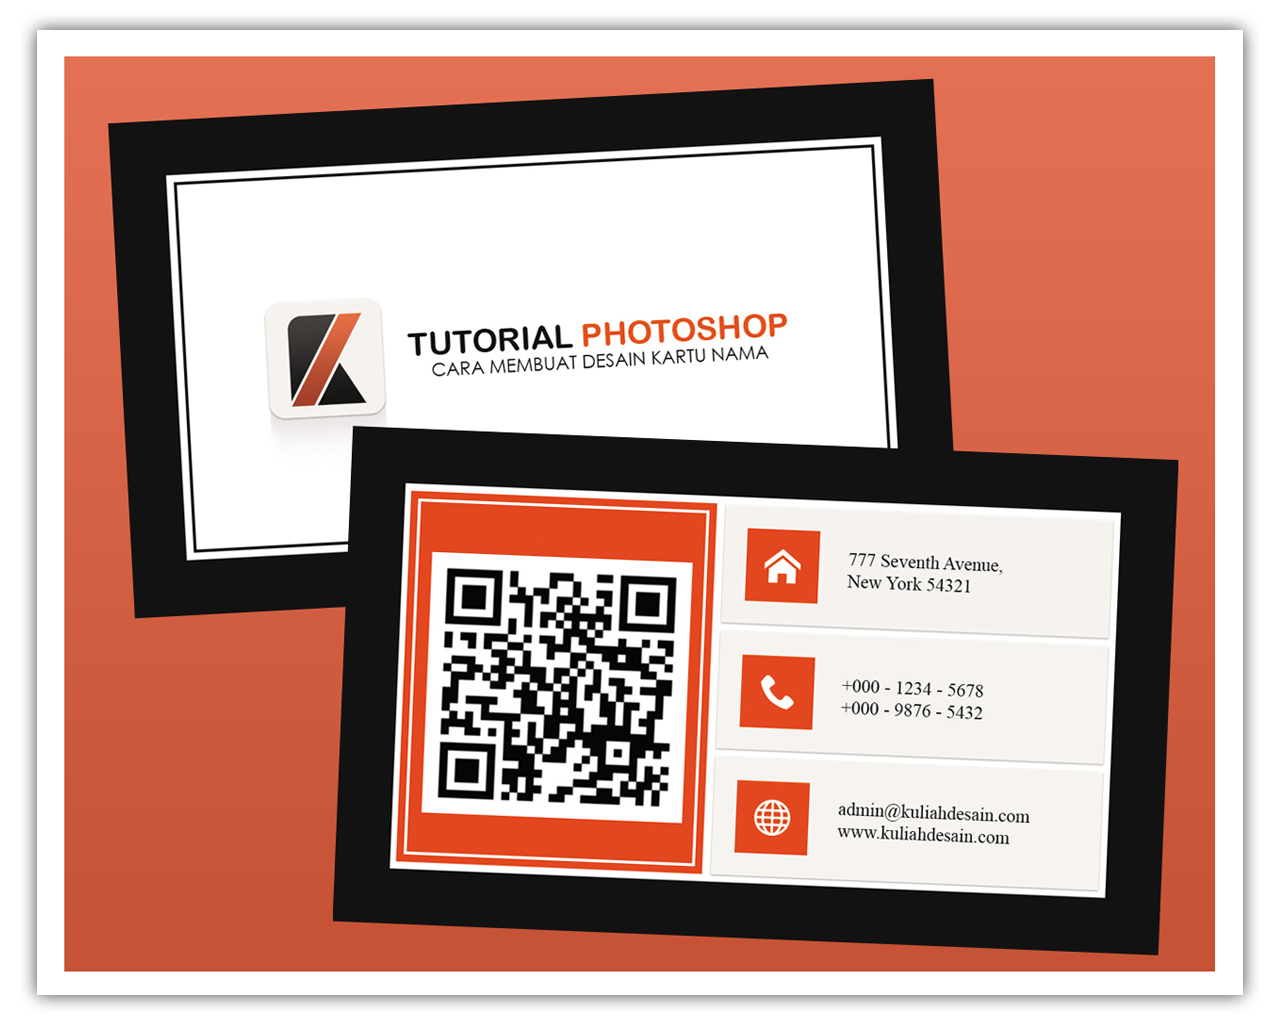
Hasil Ahir:
kuliahdesain Desain Kartu Nama Menggunakan Photoshop
Desain Kartu Nama Menggunakan Photoshop
Langkah 1
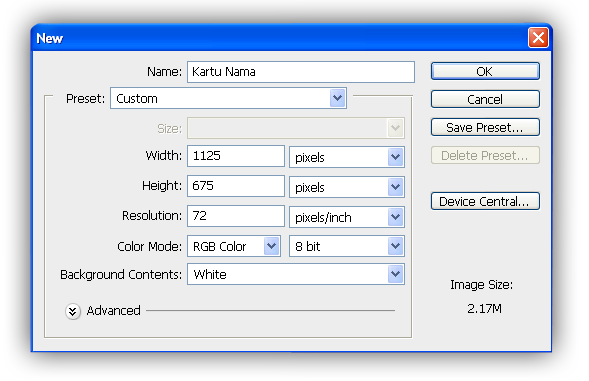
Buatlah File baru pada photoshop anda dengan ukuran 1125 x 675 pixel, dengan cara pilih File – New (CTRL+N)
new document Desain Kartu Nama Menggunakan Photoshop


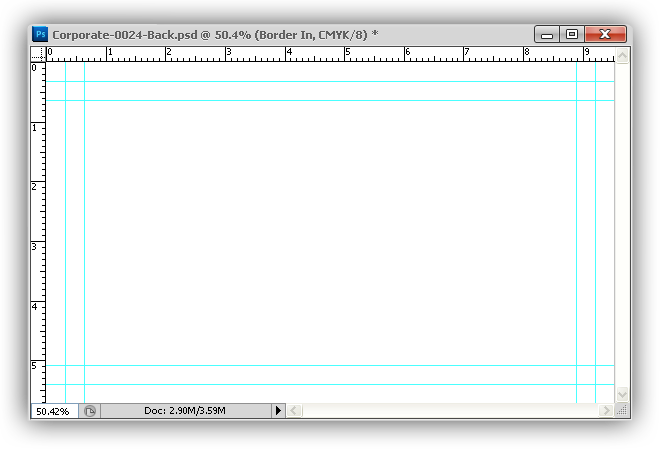
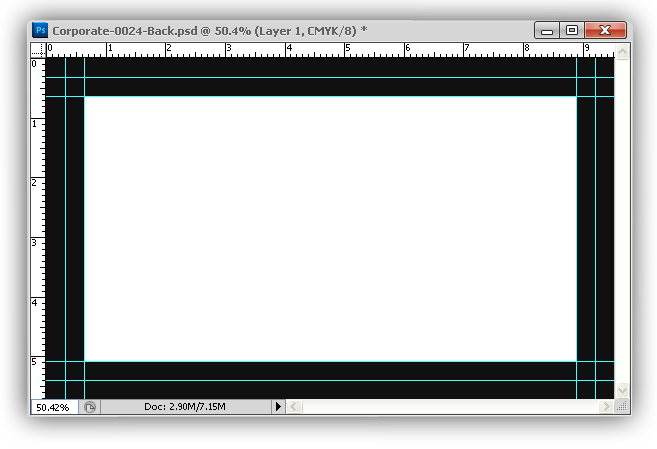
Gunakan Ruler tool untuk membuat batas. Jika belum tampil, klik menu View – Rulers (Ctrl+R)
Bulatlah seperti gambar di bawah ini
Rullers Desain Kartu Nama Menggunakan Photoshop

Langkah 2
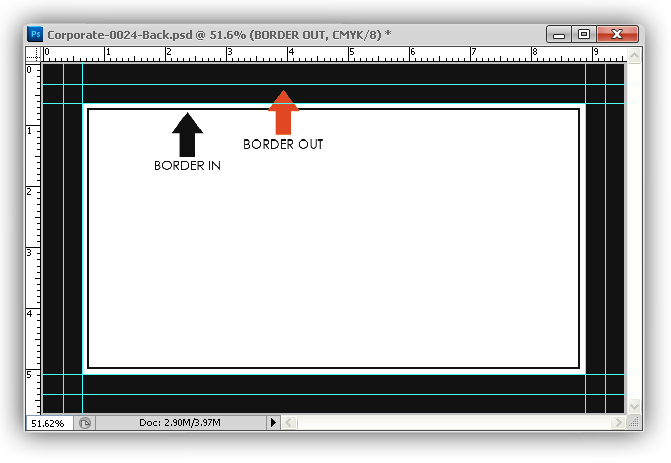
Buat Layer baru dengan cara klik Layer – New – Layer (Sift+Ctrl+N). kasih nama Border in
Lakukan lagi langkah diatas dan beri nama Border out
dan ubah warnanya jadi dark gray#111111.
dark gray Desain Kartu Nama Menggunakan Photoshop

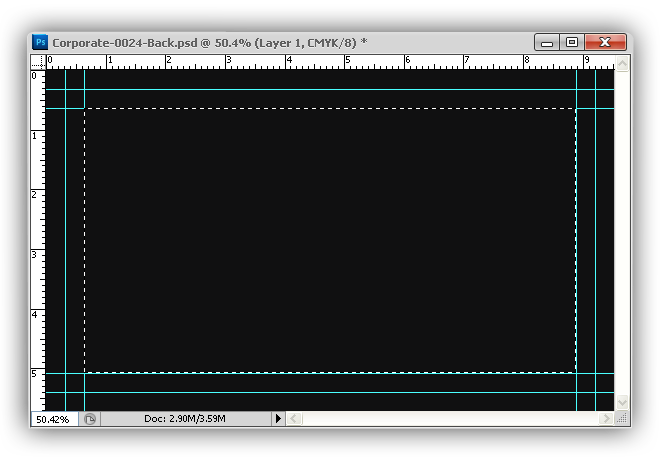
Klik layer Border out. Select All dengan cara Select – All (Ctrl+A), lalu klik Select – Transform Selection atur seperti gambar di bawah ini
Transform selection Desain Kartu Nama Menggunakan Photoshop
Tekan tombol Delete, dan hilangkan selection dengan cara Select – deselect (Ctrl+D).
deselect Desain Kartu Nama Menggunakan Photoshop

Lanjut, klik layer Border in dan lankukan lagi langkah-langkah diatas sehingga menjadi seperti ini
hasil border in dan border out Desain Kartu Nama Menggunakan Photoshop

Langkah 3
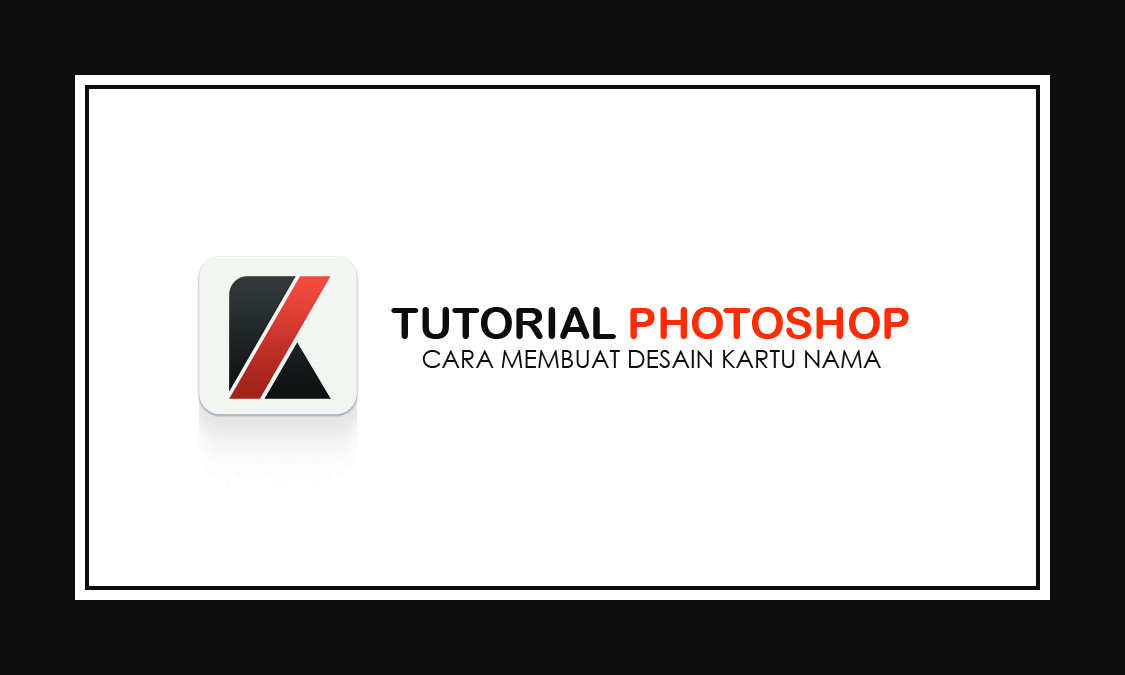
Masukan Logo perusahaan kalian dan nama/keterangan, seperti contoh gambar ini
depan Kuliah Desain Desain Kartu Nama Menggunakan Photoshop
Bagian depan kartu nama sudah jadi dan kita lanjut untuk membuat bagian belakangnya
Langkah 4
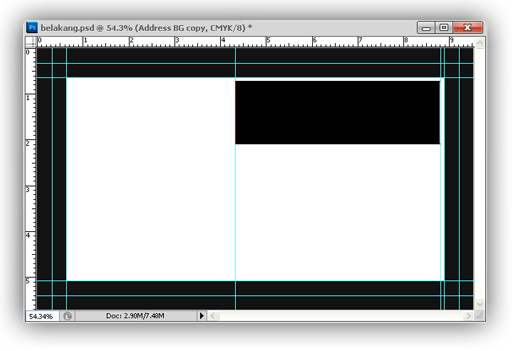
Langkah selanjutnya gunakan Rectangle Tool (U).
Shape tool Desain Kartu Nama Menggunakan Photoshop

lalu ke Blending Option caranya Layer – Layer Style – Blending Options.
Atur Color overlay dengan warna #f6f4f0
color overlay Desain Kartu Nama Menggunakan Photoshop

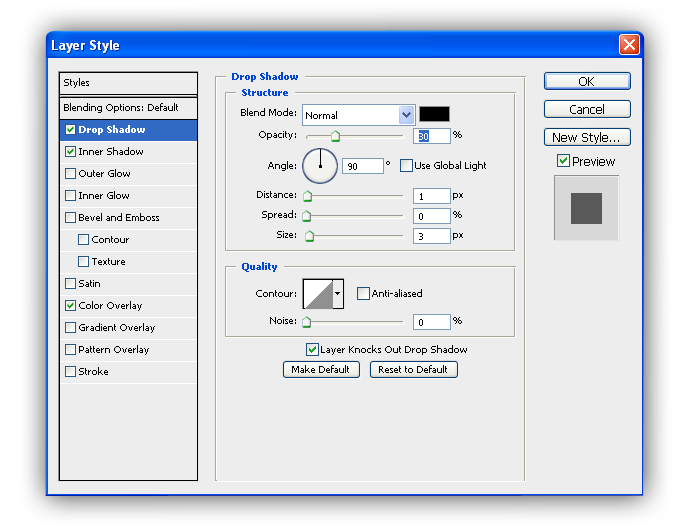
Drop Shadow warna hitam dengan Opacity 30%Distance 1, Spread 0, dan Size 3
Drop Shadow Desain Kartu Nama Menggunakan Photoshop

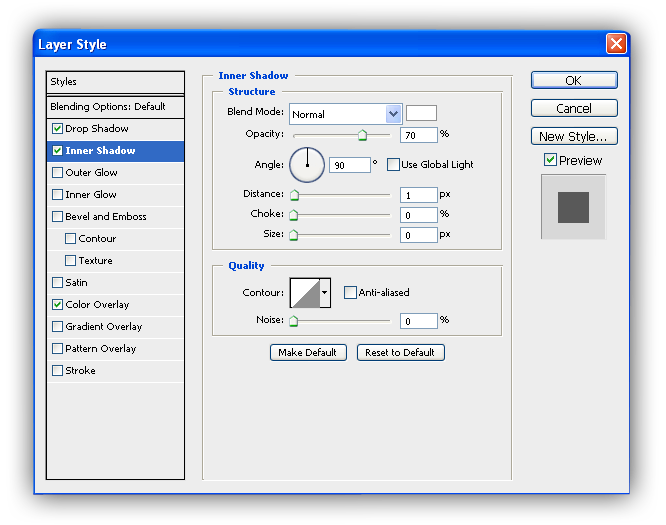
Dan Inner Shadow dengan warna putih, Opacity 70%, Distance 1, Spread 0, dan Size 0
Inner shadow Desain Kartu Nama Menggunakan Photoshop
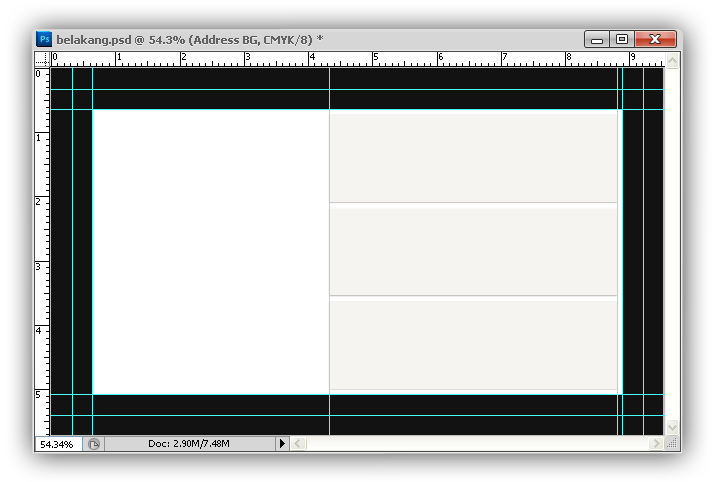
Akan terlihat seperti ini
hasil shape Desain Kartu Nama Menggunakan Photoshop

Ulangi langkah diatas untuk hasil seperti gambar di bawah ini
hasil shape 3 Desain Kartu Nama Menggunakan Photoshop
Langkah 5
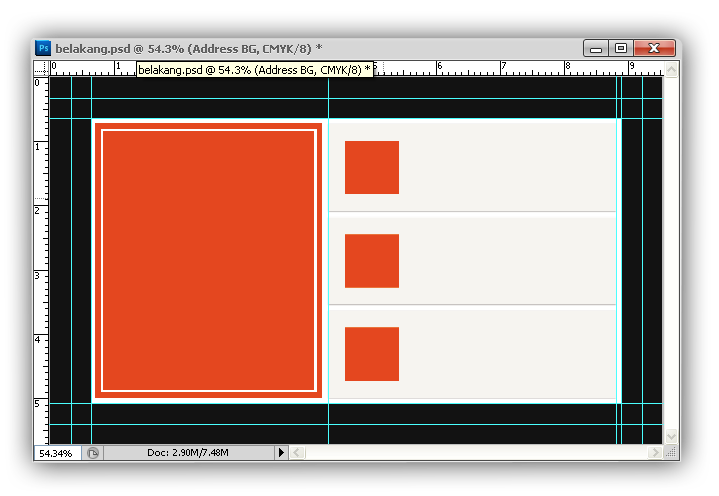
Langkah selanjutnya gunakan Rectangle Tool (U).
Gunakan warna merah.
warna merah Desain Kartu Nama Menggunakan Photoshop

Langkah 6
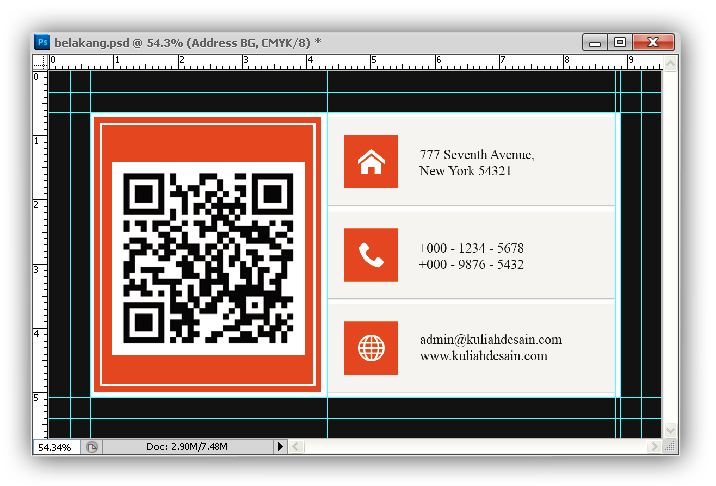
Masukan Icon Alamat, Telephon, Web, Kode QR kalian dan tulis keteranganya.
bagian belakang Desain Kartu Nama Menggunakan Photoshop
Selesai…
Kartu Nama copy Desain Kartu Nama Menggunakan Photoshop
Desain Kartu Nama Menggunakan Photoshop
Kreasikan warna dan bentuk sesuka anda sehingga menghasilkan kombinasi warna yg padu dan elegant..
Demikian tutorial membuat Desain Kartu Nama  di photoshop, semoga informasi bermanfaat untuk anda. Jika ada pertanyaan mengenai tutorial photoshop di atas, anda bisa hubungi kami di menu contact di web ini. Terimakasih anda telah mengunjungi kuliah desain dan membaca informasi mengenai.

Desain Kartu Nama Menggunakan Photoshop

Senin, 07 April 2014

Advanced Glow Effects

Advanced Glow Effects

In this tutorial, we're going to create some really sharp-looking glow effects using a combination of layer styles, the Pen Tool and Color Blending. The end effect is quite stunning and hopefully you'll pick up some tips you didn't know before.

Step 1:

As with pretty much every tutorial I've ever written, we begin with a radial gradient. This one is pretty harsh and goes from a reddish brown color to black. Here are the exact color codes:
Foreground color - #922f00
Background color - #000000

Step 2:

In this tutorial, we actually need a pretty intense center, so what we'll do is duplicate the layer we just made and set the one above to a blending mode of Color Dodge. There are a few types of blending modes, darkening ones, lightening ones, colorizing ones and inverting ones. Color Dodge is probably the strongest of the lightening ones. As you can see in the screenshot, it produces a pretty full-on center.

Step 3:

Now in our glow effect, it helps to have a nice textured background. So we are going to create a sort of smoky haze. To do this, create a new layer, then make sure you have white, #ffffff, and black, #000000, selected as your background and foreground colors.
Then go to Filter > Render > Clouds. This will give you the same random cloud pattern as above.

Step 4:

Now set the opacity of your layer to Overlay and 30% transparency. In some instances this would be enough, but for our needs we want it even smokier looking!
So go to Filter > Sketch > Chrome and use default settings of 4 and 7 for detail and smoothness respectively. Actually you can probably mess around with those if you want, but the defaults seem to be fine.
When you're done, the result should look a lot smokier (once its overlayed at 30% transparency that is). You can see the result in the background of the next screenshot.

Step 5:

Now before we can start making glows, we need to have something to glow. Here's where we break out the pen tool. If you have used the pen tool much I suggest playing around with it a little. There are some tricky things you can do with shortcuts, but for this tutorial you don't need those.
In fact all we want to achieve are some nice curves. Fortunately this isn't too hard. I find the trick is not to use too many points. Instead rely on the Pen Tool's natural curving and drag the mouse out for each point so you get a big angle. In this S-curve shown above, I've only used three points, the starting point, the end point and one in between to give it the bend.

Step 6:

Once you have a nice curve, create a new layer. Then click on the Paintbrush Tool (B) and choose a very thin, hard brush. As you know, soft brushes are the blurry ones and hard brushes are more solid. In this case I suggest using a thickness of 3.
Note that you can have any color selected as your brush color because we'll go over it with a layer style shortly.

Step 7:

Now switch back to the Pen Tool. You must switch tools in order to do this next bit.
Then right-click and select Stroke Path. A little dialog box will appear as in the screenshot. Choose Brush and make sure there is a tick next to Simulate Pressure. This is important as it will give your curve tapered ends which will make it rock!
Next right click again and select Delete Path.

Step 8:

You should now have something like the above. Just a thin, cool swishy thing.

Step 9:

Now we add some glows. The easiest way to make our glows is to use layer styles. And the best way to tell you what layer styles to use is to tell you to download the sample Photoshop PSD from the bottom of this page and then open it up and look through them there.
In a nutshell, I've added two sets of glows. To do this I first use Outer Glow and then because I want a second glow, I change the Drop Shadow settings so that it becomes a glow (you can do this by reducing the Distance and changing the blend mode to something like Color Dodge)
Oh and also I've used a Color Overlay to make the item white so that its like the center of an intense glow.

Step 10:

So now you have the same line but with a cool glow coming off it. The beauty of using a layer style is that you can copy and paste it to other layers. To do this you just right-click the layer and select Copy Layer Style then create a new layer and right-click and choose Paste Layer Style.

Step 11:

So now repeat the same process a couple of times to make more squiggly lines.
In this instance, I made one a little thicker by changing the paint brush size before I did the Stroke Path bit of the process. I also made a third line and erased part of it and sorta made it join the other two to look like a cool triangular shape.

Step 12:

Here I've added some text in and applied the same layer style to the text layers.
It's important to pay lots of care and attention to your text. When you're first starting out, use simple fonts and play with spacing between letters, words and sizes. You can achieve a lot with just some small tricks. Here I've contrasted the three words by makingGlow a lot larger and in regular casing, then made Advanced andFX much smaller, with greater space between the letters and all caps.
You can control spacing with text using the Character window. If it isn't already open go to Window > Character and it should appear. Mess about with the different settings until you learn what each controls.

Step 13:

Now we add some particles. To do this, create a new layer then select a tiny paint brush - size 3 - and just paint some dots on. It helps if they are clustered towards the center of the glow so that it looks like they are emanating from there.
You can make some of the central ones larger by doubling over on them with a second paint brush dab.
Then paste our Glow layer style on to that layer too!

Step 14:

Now that's looking pretty cool, but it will look even cooler if we give it some subtle coloring instead of this super gaudy red.
So create a new layer, and using a radial gradient, draw a blue to white gradient as shown.

Step 15:

Then set that layer to a blending mode of Color and change the opacity to 50%.
You'll see that it turns the image kind of bluish. I think that's looking much cooler already, but just to go that extra step I also created a couple of extra layers, one with some faint yellow and one with faint purple. You can see them in the screenshot above.
I set each layer to blending mode of Color and thin opacities so that they all fade together.
Advertisement

Step 16:

And there you have it: advanced glow effects with a cool color blend and subtle smoky background combined make for a pretty great effect.
Just remember to experiment with settings and try applying the glow to different things to see how it turns out. And try different color combinations, some surprising combinations turn out really beautiful. Good luck!

Sample PSD

Download the PSD for this tutorial

Tutorial lainnya : http://naldzgraphics.net/tutorials/50-ultimate-collection-of-glow-and-light-effect-tutorials-in-photoshop/

Senin, 31 Maret 2014

Create a Glowing Light Painting Effect

Create a Glowing Light Painting Effect

In this tutorial I will show you an easy, and very fast way, to create a light painting in Photoshop.
Editor's note: This tutorial was original published on Psdtuts in April of 2008.

Step 1

Create a new document and place the photo, you can download the one I used at: Photo 1.

Step 2

Here I placed a second image. I will use it to create the light effects. Here is the link for the next image: Photo 2.

Step 3

With the Pen Tool(P), create a path for one of the figures.

Step 4

Select the Brush Tool(B) and go to Window>Brushes or F5 to create our brush. Use 8px for the diameter and select Dual Brush and Other Dynamics. Follow the image below for reference.

Step 5

Go to the Layer Palette, create a new folder, and rename it to lights. After that create a new layer inside this folder, name it "dude", and select it.

Step 6

Go to the Path Palette and select the first path. Then with the Path Selection Tool(A), select the path and right-click. Choose Stroke Path. A dialog box will open; select the brush and use Simulate Pressure.
After that go to Filter>Blur>Gaussian Blur, use 1.6px for the amount.

Step 7

Duplicate the "dude" layer three times.

Step 8

Select the Rectangle Tool (U) and create a rectangle. Then duplicate the rectangle several times. After that align and distribute them horizontally.
Advertisement

Step 9

Create a new layer inside the lights folder. Rename it to "xing". Repeat Step 6 and Stroke the paths. After that select the "xing" layer and go to Edit>Transform>Distort. Now just move the vertices until the perspective is good—just follow the street lines.

Conclusion

That's probably the easiest way to create this type of light effect; however, it depends on the color of the background. If the background is too dark, the blend mode won't work. You'll probably have to use another one with an Outer Glow.
You can make the lights brighter by just duplicating the layers. You can even use the Eraser Tool(E) to make some adjustments. The original concept image can be viewed at Light Graffiti In Photoshop. The final tutorial image is below.